Over time the rubber seals in your window frames will deteriorate and let in water. Whilst temporary repairs can be made using silicone sealant, the best long term solution is to replace your existing seals with new.
Step 1: Remove the Fixed Aluminium Window Frame

Start by removing all of the fixing screws from the frame. This is normally a two person job as you need one person on either side of the fixing screw.
Once all the screws have been removed, carefully remove the window frame from the aperture making sure that you do not bend it. If the frame has been bonded in place with mastic, use a flat bladed scraper and ease it around the joint until the old mastic gives way.
Using a blunt scrapper, clean up the old frame and remove all of the old sealant. Avoid using sharp scrapers or screwdrivers as these can damage the aluminium.
Step 2: Remove the Window and Existing Seal
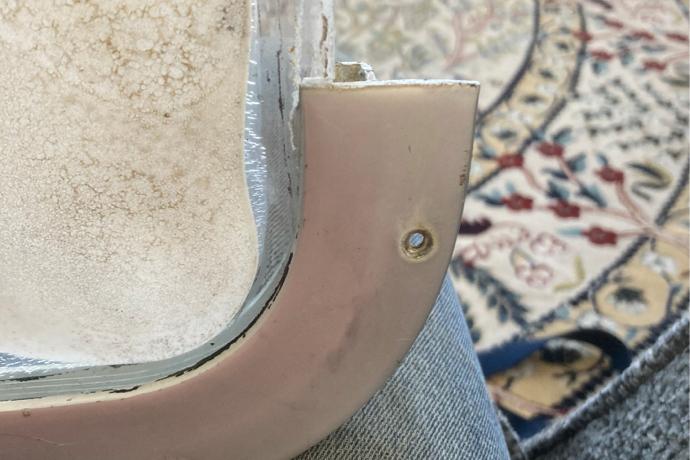
The window frame is normally made up of several sections. At each joint remove the screws that are holding the joining strip in place. Carefully tap a thin flat scraper blade or similar tool into the joint, taking care not to damage the frame. Repeat this on each joint gradually opening up the frame until it is separated. Once you have separated each section making the frame, remove the seal and window.
If the frames are subjected to the marine environment it is advisable to soak all items in a bath of fresh water for a couple of hours. This will help loosen and dissolve any residue salt deposits. After the parts have been dried more cleaning may be required on the frame.
The next job is to check the condition of the window and seal. Most windows nowadays are made from Perspex. This is an excellent material but does deteriorate over a long period of time. If you wish to replace it, draw around it onto brown paper and send it to us for a quotation.
Step 3: Take Measurements from the Aluminium Window Frame and Glass
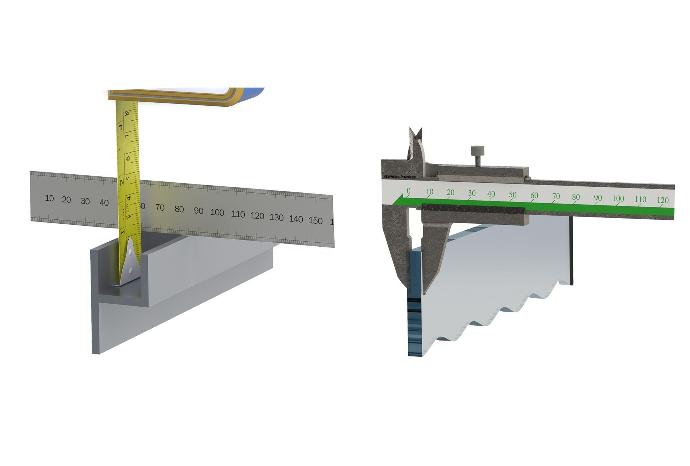
To determine the correct size seal you require you will need to take three measurements from the aluminium window frame and glass or Perspex.
1. Thickness of the glass / Perspex
2. Internal width of aluminium channel
3. Internal depth of aluminium channel
Once you have taken these measurements, you will need to decide whether you want to use a square U channel or wedge gasket with expanded neoprene strip.
Step 4a: Using a Square U Channel in an Aluminium Frame
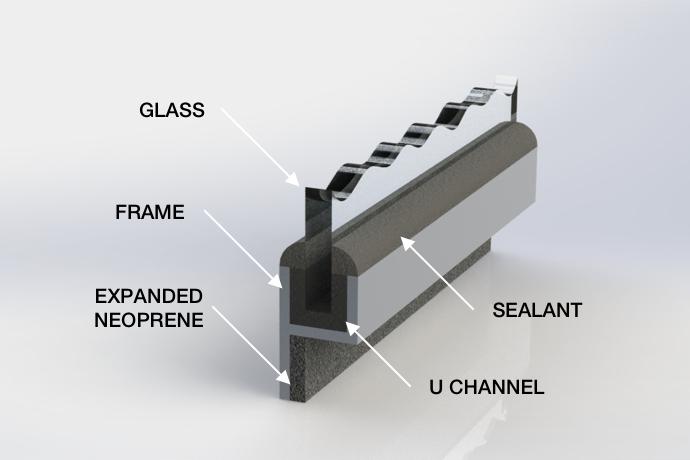
To identify the best replacement square U channel to use in your aluminium frame you will need to look at our available sections and the measurements you took during the previous step.
For example, if the internal width of your aluminium channel is 6mm and your glass thickness is 3mm you can use US52. This fits into a 6mm channel and takes a 3mm thick glass.
Most of our U channels are manufactured from 70°sh EPDM rubber which will not easily compress. If you are unable to locate the exact size you require and you cannot modify one of our existing seals please contact us with your requirements. Many seals used in old windows are no longer available and modern day equivalents have to be implemented.
Step 4b: Fitting a Square U Channel into an Aluminium Frame
To fit your replacement seal measure the length around the window frame. Cut the new seal to this length leaving it slightly oversize to prevent it shrinking back over time. Apply a small bead of marine grade high modulus silicone sealant inside the rubber and place the seal around the glass / Perspex.
Now apply a small bead of silicone sealant into the bottom of the aluminium frame. Carefully place the window and seal into the frame and pull all bits together until they are in the correct position. Now replace the screws into the joining strips.
To ensure that you have a watertight window it is advisable to apply a fillet of silicone around the top edge of the seal and frame. Mask off the frame and the window leaving about a 6mm gap. Apply the silicone and then smooth it off using a blunt instrument or wet finger. Carefully remove the masking tape whilst the silicone is wet.
Step 5a: Using a Wedge Gasket in an Aluminium Frame
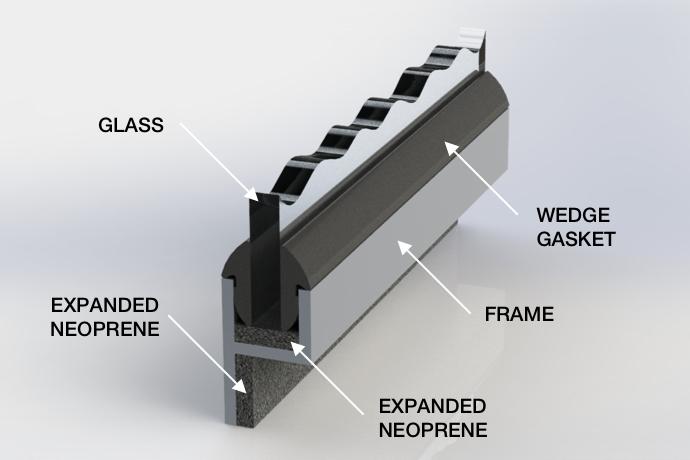
To identify the best replacement wedge gasket to use in your window frame look at our available sections and the measurements you took during step 3. Depending on your measurements, you can either use two wedge gaskets (one either side of the glass) or a combination of expanded neoprene and wedge gasket.
For example, if the internal width of your aluminium channel is 8mm and the thickness of your glass is 3mm, you have a gap of 5mm (2.5mm either side of the glass). You could use a wedge gasket, such as WS1580, either side of the glass. This gasket is designed to fit into a 2mm to 3mm gap.
For example, if the internal width of your aluminium channel is 7mm and the thickness of your glass is 3mm, you have a gap of 4mm. You could use a wedge gasket, such as WS1580, on one side of the glass and expanded neoprene on the other side. If using expanded neoprene strip, you will need to allow for 30% compression of this strip.
Step 5b: Fitting a Wedge Gasket into an Aluminium Frame
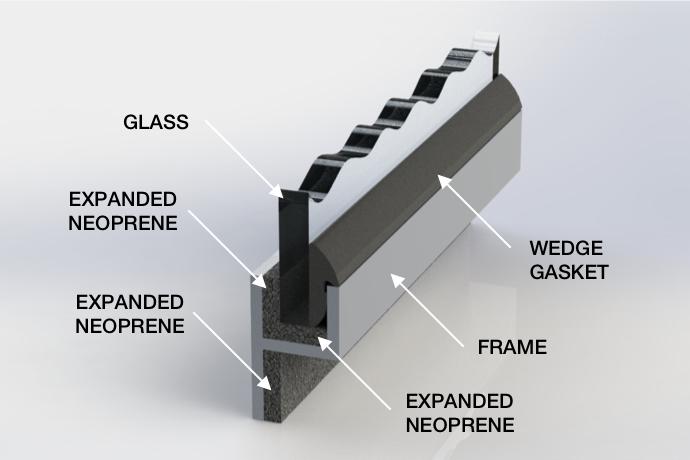
Place a strip of expanded neoprene into the bottom of the aluminium channel. This provides the glass / Perspex with a soft cushion. Run a small bead of marine grade silicone sealant onto the face of the expanded neoprene and assemble the frame around the glass / Perspex. Ensure that window is sitting centrally. Push the wedge gasket using your fingers or thumb into the gap either side of the window between the glass / Perspex and frame.
If you want to use expanded neoprene on one side of the window, insert a strip of expanded neoprene against the inside wall before inserting the glass / Perspex and assembling the frame.
Step 6: Refitting the Completed Window
When refitting the completed window into the boat you will require a seal to go between the frame and the cabin side. The best material to use is a closed cell expanded neoprene, about 3mm thick and slightly wider than the flange. This can be trimmed off when the window is fully fitted.
Apply this to the frame and pre drill the bolt holes. Just before fitting the window to the boat smear a small amount of silicone sealant onto the top face of the seal. This will accommodate any minor imperfections and stop any leaks. Fit the screws and tighten up to achieve a 30% compression on the seal. Carefully trim the expanded neoprene around the edge of the frame using a sharp knife, and wipe away any excess sealant.